Ontosight® – Biweekly NewsletterJune 17th – June 30th, 2024 –Read More
Ontosight® – Biweekly NewsletterJune 17th – June 30th, 2024 –Read More

May 24

Apr 24

Innoplexus wins Horizon Interactive Gold Award for Curia App
Read More
As I have been diving deep into the development of EOS dApp, I have come across so many good articles. Here, I am aggregating all the knowledge I got after doing some research. In this article, I will be explaining how to use EOSJS and scatter together. I am assuming you have a basic understanding about smart contracts and how to deploy them on EOS blockchain as I’ll be skipping that part in this article.
We are building a simple todo dApp. We will write a smart contract for the CRUD (create, read, update, and delete) operations and will interact with deployed contract using EOSJS and scatter. CRUD operations include creating, completing, removing and getting todos. We will use Jungle Testnet for deploying our smart contract.
Scatter is used to sign transactions for blockchain and provide personal information to applications without ever exposing your keys. For setting up your scatter wallet, follow this video. In scatter settings, you have to add the jungle testnet in networks with the following details:
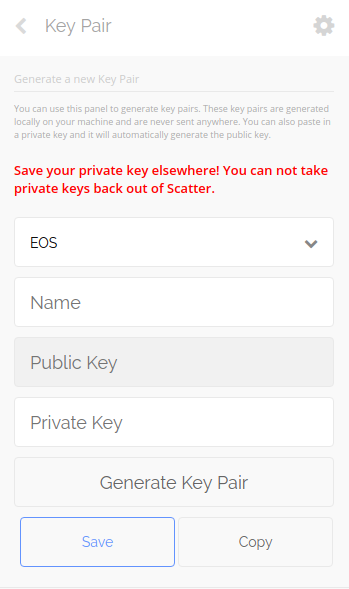
After adding the network configuration, now import your private key into the wallet by going into key pair section then click on new. Fill in the key information according to the form as shown in the pic below.
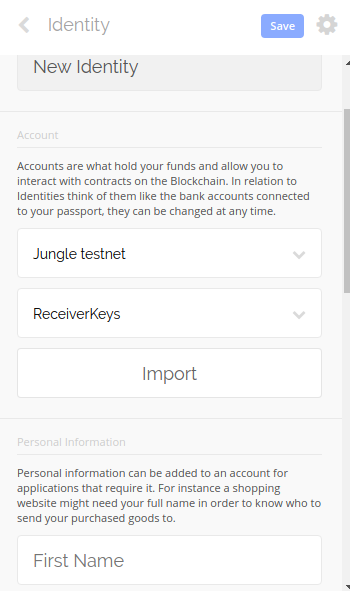
Now you should add an identity using your key pair. Go to identities section and add or edit existing identity if it is of no use. In the identity section, select the network and then key pair, it will ask you to add your account associated with that key on the chain net. You should add the account with active permission.
Your scatter is all set up and ready to be used in our dApp.
For deploying the todo smart contract, follow this article and deploy it on Jungle Testnet. Make sure you are able to interact with Testnet from the command line as mentioned in the article.
I am using ReactJS for the frontend part. The complete logic and flow is in a single file named index.jsx inside the src folder. Following is the configuration object:
Interacting with scatter:
Now, in this object we have two references EOSClient and scatter which we will be using to interact with EOS blockchain and wallet respectively.
I am adding the code for one functionality to get the stored data (all the todos) using EOSClient, the rest of the functionalities you can check in the src/index.jsx
To get the account, use getIdentity() of scatter object:
That’s it.
One of the biggest advantages of this is you don’t have to maintain a wallet on your machine, scatter manages everything for you. There are other methods also to host the wallet but scatter gives the responsibility to end user and nothing private needs to be handled by the developer.

The cost of developing a new drug roughly doubles every nine years (inflation-adjusted) aka Eroom’s law. As the volume of data…
There was a time when science depended on manual efforts by scientists and researchers. Then, came an avalanche of data…
Collaboration with key opinion leaders and influencers becomes crucial at various stages of the drug development chain. When a pharmaceutical…
Data are not the new gold – but the ability to put them together in a relevant and analyzable way…
Artificial intelligence, or AI, is gaining more attention in the pharma space these days. At one time evoking images from…
Artificial intelligence (AI) is transforming the pharmaceutical industry with extraordinary innovations that are automating processes at every stage of drug…
There is a lot of buzz these days about how artificial intelligence (AI) is going to disrupt the pharmaceutical industry….
Drug discovery plays a key role in the pharma and biotech industries. Discovering unmet needs, pinpointing the target, identifying the…
The pharmaceutical industry spends billions on R&D each year. Clinical trials require tremendous amounts of effort, from identifying sites and…
Training algorithms to identify and extract Life Sciences-specific data The English dictionary is full of words and definitions that can be…
The early 1970s introduced the world to the idea of computer vision, a promising technology automating tasks that would otherwise…
Summary: AI could potentially speed drug discovery and save time in rejecting treatments that are unlikely to yield worthwhile resultsAI has…